Thursday, April 17, 2025

To access your mobile camera in laptop

To access your mobile camera on your laptop 

Note : Don't miss use it

  •  Download Webcam from Iriun.com (In Laptop)
  • Download Iriun app in your mobile from Play store
  • connect laptop and mobile on same wifi 
  • open application on  both devices


Thursday, March 20, 2025

How to enable Remote access in TP Link wifi Router

 To enable remote access in TP link wifi Router 


  • Login the TP Link Wifi Router (192.168.0.1)
  • Go to advance 
  • Select System tools 
  • Select Administrator 
  • here will be show Remote Management Enable it (Port no : 80)
  • Allow All for access from any IP in network  


Thanks !!

Configuration of TP Link wifi router through Mobile

Configuration of wifi router through Mobile

1st we need to connect wifi router in mobile via mobile wifi

  • Turn on the wifi of mobile 
  • See the SSID and Password of wifi Router mentioned back side of the Wifi Router
  • Connect with there SSID and Password 
  • Go on Chrome 
  • Search 192.168.0.1 or 192.168.1.1
  • there will be ask for login username and password (mention same of both username : admin  password admin
  • after his wifi configuration will be open 
  • Go to Advance  > Network  > LAN > 
  • Assign IP static or DHCP 
  • Go on Advance >  wireless  there edit SSID name (as your choice) 
  • Go on Wireless Security edit Password (as your choice)    

Save all configuration and reboot the Router, now wifi route configuration done.


Thanks !!


go to advance select network and choose DHCP or Static and assign ip if static and if required you can also mention here Domain IP address 

go to wireless and change SSID name 

reconnect wifi with New SSID name and login with old pass

go to wireless security and change Password as you think  and again reconnect wifi with New SSID and new Password

Reboot wifi Router 

basic configuration is done now you can use network of wifi router...


Thanks !


Tuesday, March 18, 2025

Configuration of the TP link WiFi Router Through Laptop/Desktop

 Installation of the TP-Link Wifi Router 

1. Configuration through Laptop/Desktop

  • Connect wifi with Laptop through LAN Cable 
  • LAN cable one point to be connect with wifi LAN point and 2nd point to be connect with Laptop RJ45.
  • Now to go network setting and do set on Obtain an IP Address Automatically
For the Guide by Graphic 


Right Click on Ethernet go to these properties


  • Select Internet Protocol Version 4 (TCP/Ipv4) and click Properties

  • Enable IP Address and DNS server Automatically 
  • now wifi is locally connected with Laptop 

Go on Chrome and Search 192.168.0.1
wifi configuration Page will be Open and Username and Password will be ask 

Username : admin
Password : admin
  • 1.1

  • 1.2

  • 1.3

  • 1.4

  • 1.5
Click on Finish 
Basic Configuration is done on it wifi router will be started to work now you can login and use network of wifi router 


Note : If you are configuring wifi router of any organization than you can assign org DNS Server IP for that login Wifi router and go to 
Advance  >  Network  >  LAN Setting 
There will be show Primary DNS and secondary DNS (assign Your org DNS Server IP)


Thanks !!

Wednesday, April 3, 2024

Configuration of the OwnCloud

Installation of  OwnCloud on Ubuntu 22.04


1:) Install the ubuntu 22.04 
2:) Setup the network
3)  Install required software
4:) Enable root and create password 


Search owncloud base script


https://github.com/linuxsyr/owncloud


Download or copy the code 

#!/bin/bash    
showMe(){
 echo "@@@@@@@@@@@@@@@@@@@@@@B?!JJ55#@@@@@@@@@@@@@@@@@@
@@@@@@@@@@@@@@@@@@@@@G!^~J!?#@@@@@@@@@@@@@@@@@@@
@@@@@@@&#BBBBBB#&@@@5!7?777J@@@#BBB#BB##&@@@@@@@
@@@@&#BGGGBBPPPGG&@#7?!77!77#@GBPPPBBBGGBB&@@@@@
@&&#BGGGGGBBPPPBB&@YJ??J?J??G@BBGPPBBBGGGGB##&@@
@@#BBGGGGGGBGGG#B&#GGGGGGGGGG&##GGGBGGGGGGBB#@@@
@##BGGGGGGGGBBBB#&B55PPPPPP5G&#BBBBBGGGGGGGB##@@
@@&BGGGGGGGGBBBBBPYPB@@@@@#PYPBBBBBGGGGGGGGB#@@@
@@#BBGGGGGGGGG#BY5PPB@@@@@#PG5YB#BPGGGGGGGBB#@@@
@@&&BBGGGGGGGGGGYGPPB@&P#@#PPG55GGPGGGGGGGB##@@@
@@@&BBGGGGGBGBGBYGPPB@@#&@#PPG5PBBGBGGGGGGB&@@@@
@@@&#BBGGBGBBBB@YPPPB@@&@@#PPGY&#BBBBBGGGG##@@@@
@@@@#BBBBBBB##@@GYGPB@&P#@#PG5P@@##BBBBBBBB@@@@@
@@@&BBBBBB#&@&##&G5PB@@@@@#P5P&&##@&#B#BBBB&@@@@
@@@#BB#B##@@@#5PB&B5P&@@@&GYG&#PPG@@@&#B#B#B@@@@
@@#BB###@@@@@@BPPPGBG5PGP5PBBPPPG@@@@@@&B#B##@@@
@&####&@@@@&BPY5PP5PPBGPGGPP5PP5J5B&@@@@&#####@@
&###@@@@@@@&GJYJY555PYB?G55PP55JYY5#@@@@@@@&##&@
#&@@@@@@@@@@@@BGYJ5J5P5?YP5YYYJGB&@@@@@@@@@@@@#&
@@@@@@@@@@@@@@@@&@BG#BGBGG#GG&&@@@@@@@@@@@@@@@@@
@@@@@@@@@@@@@@@@@@@@@@@@@@@@@@@@@@@@@@@@@@@@@@@@
@@@@@@@@@@@@@@@@@@@@@@@@@@@@@@@@@@@@@@@@@@@@@@@@
@@@@@@@@@@@@@@@@@@@@@@@@@@@@@@@@@@@@@@@@@@@@@@@@
"
}
showMe    
echo " Linuxsyr"
echo "$(tput setaf 2)Thanks for using this script....."
sleep 1s
reset
sleep 1s
echo "$(tput setaf 2)linuxsyr-youtube....."
sleep 2s
reset
apt-get update  # To get the latest package lists
apt install apache2 mariadb-server -y
apt install php7.4 libapache2-mod-php7.4 php7.4-{mysql,intl,curl,json,gd,xml,mbstring,zip} -y
apt install curl gnupg2 -y
apt-cache policy php
add-apt-repository ppa:ondrej/php --yes &> /dev/null
sudo add-apt-repository ppa:ondrej/php
apt update
apt install php7.4
php7.4 -m
apt-cache search php7.4-mysql
apt install php7.4-mysql
apt install php-pear
apt install mariadb-server 
apt install php7.4 libapache2-mod-php7.4 php7.4-{mysql,intl,curl,json,gd,xml,mbstring,zip} -y
echo 'deb http://download.opensuse.org/repositories/isv:/ownCloud:/server:/10.9.1/Ubuntu_22.04/ /' > /etc/apt/sources.list.d/isv:ownCloud:server:10.list
curl -fsSL https://download.opensuse.org/repositories/isv:ownCloud:server:10/Ubuntu_20.04/Release.key | gpg --dearmor > /etc/apt/trusted.gpg.d/isv_ownCloud_server_10.gpg
apt update
apt install owncloud-complete-files -y
mkdir /var/www/owncloud
cat > /etc/apache2/sites-available/owncloud.conf << 'EOL'
Alias / "/var/www/owncloud/"
<Directory /var/www/owncloud/>
  Options +FollowSymlinks
  AllowOverride All
 <IfModule mod_dav.c>
  Dav off
 </IfModule>
 SetEnv HOME /var/www/owncloud
 SetEnv HTTP_HOME /var/www/owncloud
</Directory>
EOL
a2ensite owncloud.conf
a2dissite 000-default.conf
a2enmod rewrite mime unique_id
apachectl -t
systemctl restart apache2
mysql --password=1234 --user=root --host=localhost << eof
create database ownclouddb;
grant all privileges on ownclouddb.* to root@localhost identified by "1234";
flush privileges;
exit;
eof
cd /var/www/owncloud
sudo -u www-data php occ maintenance:install \
   --database "mysql" \
   --database-name "ownclouddb" \
   --database-user "root"\
   --database-pass "1234" \
   --admin-user "root" \
   --admin-pass "1234"


Open CMD 
 
 Run owncloud base script 


after installed the script owncloud  will be installed 

open any browser and access own cloud by his IP Address 
first search (localhost/owncloud)

Default owncloud username and password
username : root
password : 1234


for access from another system we need to change the configuration..

                        
                                                                                                        Thanks 
                                                                                                        Danish

Friday, December 15, 2023

INSTALATION AND CHECK SNMP V2C ON HUAWEI AR161 ROUTER

 INSTALATTION OF SNMP V2C on router


<4,Akbar Road>system-view

 [4,Akbar Road]snmp-agent sys-info location 4AR

 [4,Akbar Road]snmp-agent sys-info version v2c

 [4,Akbar Road]snmp-agent community read gjhgdgsgffddfsdaffdfddg(Password)

[4,Akbar Road]snmp-agent target-host trap-paramsname pentagon v2c securityname scimplsvpn private-netmanager

[4,Akbar Road]save

Are you sure to continue?[Y/N]:y

  It will take several minutes to save configuration file, please wait.........................................................

  Configuration file had been saved successfully

  Note: The configuration file will take effect after being activated


HOW WE CHECK CONFIGURATION OF SNMP V2C

Login Router Through Tera Term or Putty

Run command

4,Akbar Road]display current-configuration | section snmp

 snmp-agent local-engineid 800007DB03B443269A5DE4

 snmp-agent community read %^%#w5|9>!Dm,A.7LzUlZM\I}arSVES]4$,)#{1P+\)D5'sV!;-@)(;'<##jqnXQP,-e,[kmF(5jznFtsl'A%^%#

 snmp-agent sys-info location 4AR

 snmp-agent sys-info version v2c

 snmp-agent target-host trap-paramsname pentagon v2c securityname %^%#y1^4/B^s0>4rA.#'}:]Q&&tnF}@<o$LRE_R,8BIG%^%# private-netmanager


Project: Company/Project Name

####SNMP V2C####

SNMP Agent: All edge router

SNMP Version: V2C

Community String: fdfjsdljflsjdflsdjflsdjfsdlfn(Password)

Securityname :  India


Sunday, December 10, 2023

Create of Host Group, Map and Host in Zabbix Server

How to create Host Group in Zabbix Server 

1. login Zabbix

after login select Data Collection > Host Group > Create Host Group 

Click on Create Host Group 
Here fill your Host Group Name and add it.  and than you will saw you group name in Host Groups.


To create Map on Zabbix Server

After Login Zabbix Click on Monitoring > Map 

Select Create Map and fill the name of your Map and add it.


The MAP is ready now you can Degine your all host on MAP.


To configure Host  
Click on Data Collection/Configuration( in old version will show Configuration and in new version showing Data collection)

Data Collection > Hosts > Create Host 

Fill your host name, host group and network device IP after fill all click on add

You can create multiple host like it. 


Clear the console login password of Huawei AR161

                   How to restore console password of Huawei AR161 Router

Note : Sometimes we forget console login password  of Huawei AR161 router, so for the break password..  

1: Restart the router 

2: In booting process will show 

    (Press Ctrl+B to break auto startup)

after press ctrl+B asking for default password of Huawei Router

3: Default Password = Admin@huawei

4: main menu 

   1. Default Startup
   2. Serial Menu
   3. Network Menu 
  4. Startup Select 
  5. File Manager
  6. Reboot
  7. Password Manager
 7 (to enter in password manager)

5: Password Menu
   1. Modify the menu password 
   2. Clear the console login password 
   3. Return
2 (to clear console login password)

After clear the console login password success 

Password Menu
  1. Modify the menu password 
  2. Clear the console login password 
  3. Return

                                               3 (to Return in main menu)

 main menu 

   1. Default Startup
   2. Serial Menu
   3. Network Menu 
  4. Startup Select 
  5. File Manager
  6. Reboot
  7. Password Manager
                                            1 (to start the default startup)

Note : To select option use only numeric key (like-7,2,3,1)


When will press 1 than he will automatically start to boot after complete boot in last option will ask for press any key to get started ....

after complete it all 

First configure the username and password by using of the aaa configuration then reboot the router and login again by using of new username and password....


For you support picture is attached


Friday, August 18, 2023

How to install Putty on ubuntu


How to Install PuTTY on Ubuntu 

Step 1

Login into Ubuntu Desktop. Press Ctrl + Atl + T to open GNOME terminal. If for some reason the shortcut didn’t work, run the Terminal from the Ubuntu Dash.


Step 2

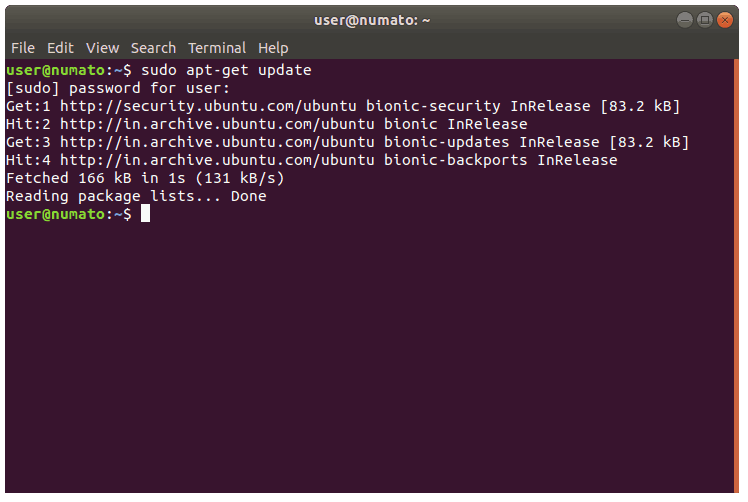
Run the following command in the terminal.

>> sudo apt-get update

sudo apt-get update


Step 3

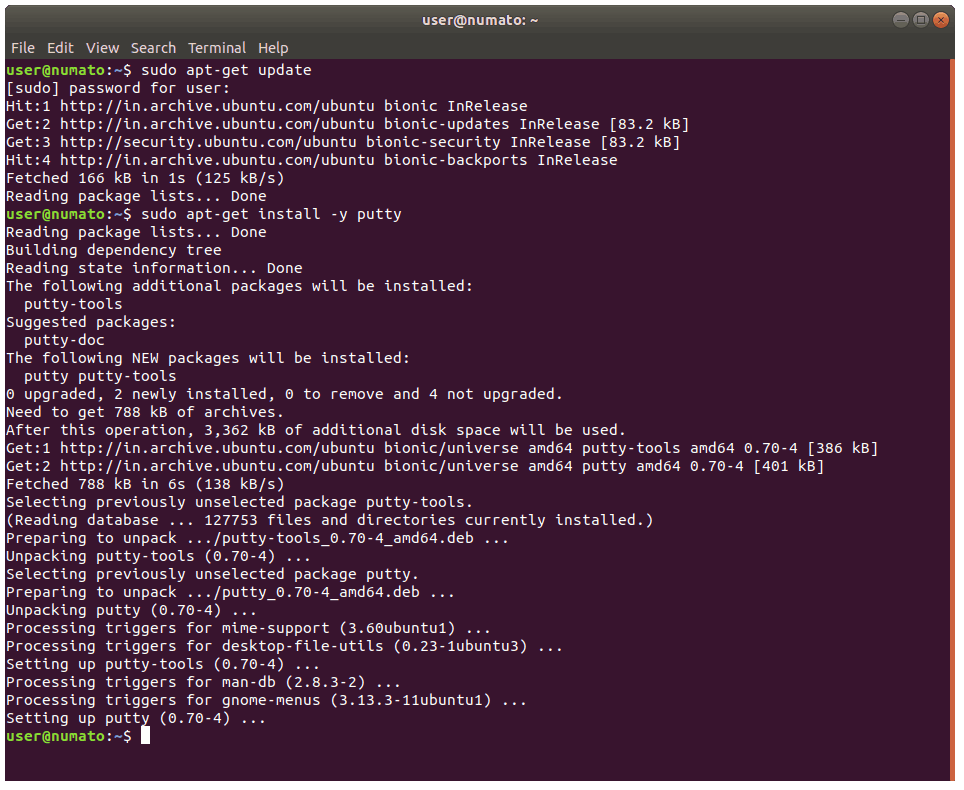
Install PuTTY using the command below.

>> sudo apt-get install -y putty

sudo apt-get install -y putty

 Step 4

PuTTY should be installed. Run it from the terminal using “putty” as command, or from the Dash.

>> putty


Optional: Compiling from source

While it is not recommended for beginners to compile PuTTY from source, one can choose to compile PuTTY from source. Download the PuTTY source files here. Extract the archive file using the command and follow the README file inside the archive to compile PuTTY from source.


                                                                                                              Written By Danish 


Sunday, July 30, 2023

Networking.

                                                            Networking
 Network  =  It is a connection of multiple host which is used to share data resourse & information  for purpose of                        saving time money & men power is called Network.
         
                                                                    Data
        It is a communication of 1 & 0 or it is collection of information and always store in format.

      abc.txt              Text file
            .doc             word file
            .cdr              corel draw
            .pdf             adobe reader
            .jpeg             Image
            .mp3             Audio
   
                                                            Types of Data
   structure of data               SQL,Orrecal
   Semi structure                   PDF,EMAIL,EXCEL,
   On structure                       Movies, sony, image,
             
                                                              Networking
    
  A process which is used to create manage & maintenance a network is called networking.
  
                                                     Types of Networking
  There are so many types of network.
   LAN     Local Area Network
   WAN    Wide Area Network
   MAN     Metropolitan Area Network
   SAN       Storage Area Network
   CAN       Campus Area Network
   PAN       Personal Area Network

  LAN = Host connected in a room, building, campus, or maximum 3 mile rang is called LAN.
 It is a basic Networking of any Network. It is also known as Ethernet.
 1 mile = 1.6km
 3 mile = 1.6*3=4.8km
    
  WAN = There are no limitation of network Internet is a best example of WAN It is series of LAN.
  MAN =  It is private and secure network of any company it is combination of LAN & WAN  limitation
                of MAN is 100km.
  It is support 100km Rang.
   SAN = A network dedicated for storage.

   CAN = It is Extension of LAN mostly it is a wireless network available in a limited rang.
   PAN = The Network which is used to personal use is called PAN.


To access your mobile camera in laptop

To access your mobile camera on your laptop  Note : Don't miss use it  Download Webcam from Iriun.com (In Laptop) Download Iriun app in ...